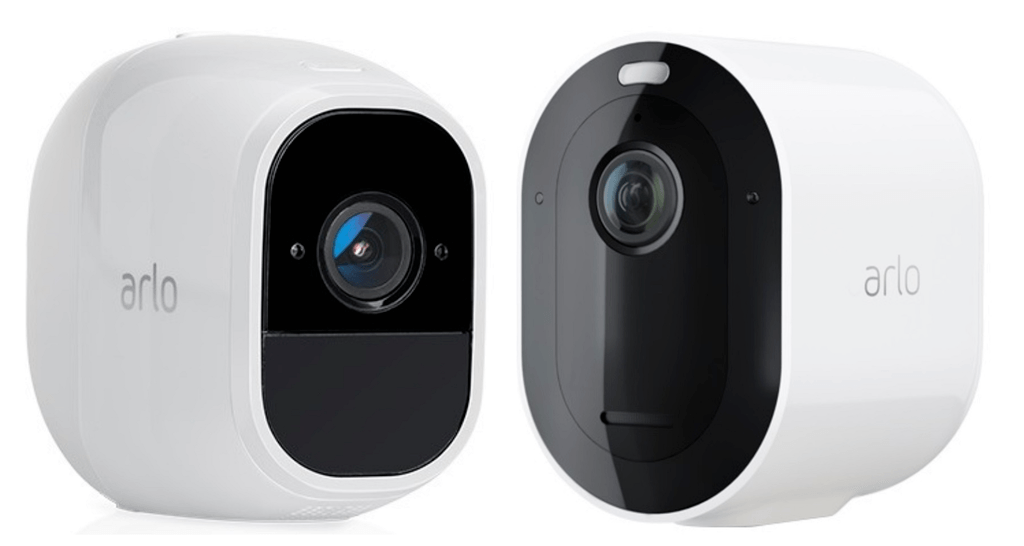
When the original Arlo wire-free was announced, it created quite the buzz. The Netgear solution to home security cameras caught on quick. Further upgrades made the Arlo Pro 2 a powerhouse in the field and worthy competitor to all other cameras. The Arlo Ultra aimed to topple the market, but most owners found it to be too much.
The latest release, the Arlo Pro 3, takes the Ultra a step back to accommodate more users and their desires. Is the Pro 3 worth moving on from the Arlo Pro 2? The short answer is yes. Read on to find out why.
Contents
The Differences between Arlo Pro 2 and 3
When Arlo set out to make a better version of the Ultra, the Pro 3 was the final result. Is it better than the most popular Arlo, the Pro 2? Perhaps, but it is different. Here is how.
- Free Cloud Storage. The Pro 2 comes with a free subscription to the Cloud Storage, with a 7-day rollover. The higher resolution of the Arlo 3 doesn’t allow for the free storage option.
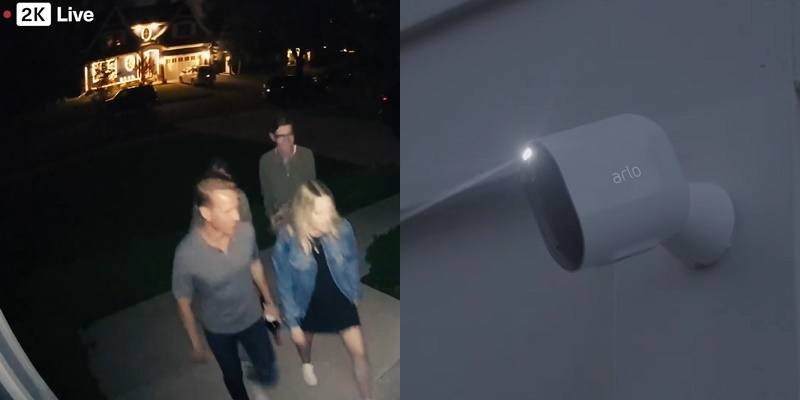
- As I just mentioned, the Pro 3 has a higher resolution (2k) versus the 1080p HD of the Pro 2.
- High Dynamic Range (HDR). HDR allows the Pro 3 to produce moving images that more clear instead of grainy, smokey, and without bleeding colors.
- The Pro 3 comes with a spotlight above the lens that the Pro 2 doesn’t have.
- Siren location. Both models have a siren, but the Pro 2 siren is located in the base hub. Pro 3’s siren is in the camera itself.
- Arlo 3 uses the same SmartHub as the Ultra. It has more features than the standard hub that the Arlo Pro 2 uses. This includes the use of Z-wave and ZigBee devices.
The Similarities between Arlo Pro 2 and 3
Even though the Pro 3 is a few models newer, there are still a lot of similarities between it and the Pro 2. Let’s take a look at what features they have in common.
[easyazon_image align=”none” height=”334″ identifier=”B075P84FH2″ locale=”US” src=”https://smartrobotichome.com/wp-content/uploads/2019/12/410H7eHqiqL.jpg” tag=”srh-easyazon-20″ width=”500″]
[easyazon_image align=”none” height=”333″ identifier=”B07X36VWCT” locale=”US” src=”https://smartrobotichome.com/wp-content/uploads/2019/12/41qHZ9pOqOL.jpg” tag=”srh-easyazon-20″ width=”500″]
- DIY installation. Both models can be connected, powered, and online in under 20 minutes.
- Dual-power options. The Pro 2 and Pro 3 can both be used wirelessly through rechargeable batteries or tethered to a wired connection.
- Indoor/Outdoor mounting. Each device is weather-resistant and has an operational range between 14 and 113 degrees (F) for mounting outdoors or indoors.
- Two-Way communications. A speaker and microphone are built into each camera, allowing for two-way communications.
- Smart home integration. You can connect either model to Amazon Alexa, Google Assistant, Apple HomeKit, IFTTT, Wink, Z-wave, Zigbee, and other 3rd party integration systems.
Specifications Chart
Here you can see the similarities and differences side-by-side to get a better idea of what the two models offer you.
| Arlo Pro 2 | Arlo Pro 3 | |
| Battery | Rechargeable | Magnetic charging |
| Battery Life | 6 months | 6 months |
| Power Options | Battery, Hardwired | Battery, Hardwired |
| Outdoor Mount | Yes | Yes |
| Operating Temperatures | -4 – 113 degrees F | -4 to 113 degrees F |
| Continuous Recordings | Yes | Yes |
| 3-Second Look Back | Yes | Yes |
| WiFi | Yes | Yes |
| Mobile App | Yes | Yes |
| Voice Commands | Yes | Yes |
| Smart Home Integration | Yes | Yes |
| Night Vision | Yes | Yes |
| Resolution | 1080p | 2k |
| Field of View | 130 degrees | 160 degrees |
| Motion Detection | Yes | Yes |
| Scheduling | Yes | Yes |
| 2-Way Communication | Yes | Yes |
| Live View | Yes | Yes |
| Storage | Yes | Yes |
| USB Backup | Yes | Yes |
| Siren | Yes | Yes |
| Price | Check on Amazon | Check on Amazon |
Comparing the Features of Arlo Pro 2 and Arlo Pro 3
For most instances the Arlo Pro 2 and Pro 3 function the same. They offer similar subscription packages and aside from the cost, the Pro 3 just does things a little better. Let’s find out how they compare to one another on the prominent features they offer.
Installation is DIY
The installation is a simple one. Unlike some other security devices, you won’t need to call in a professional. If you can read an email, use a smartphone and turn a screwdriver, you can install these cameras. Here is the basic rundown of how it is accomplished.
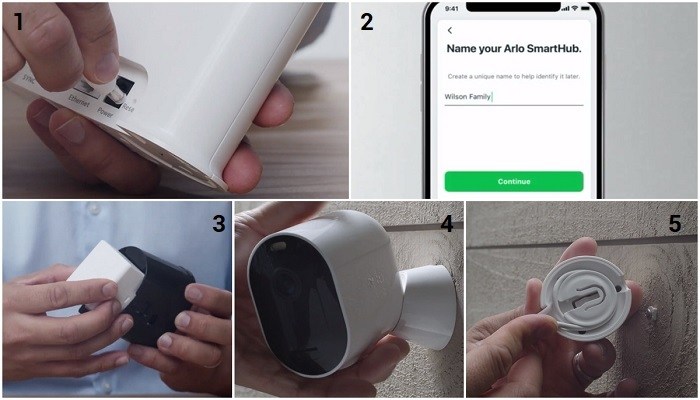
- The first step is always to unbox your system and lay everything out to verify it is there, has no damage, and so you can see all the pieces.
- Find the hub, connect the Ethernet cable to the modem, plug in the power cord, and turn the hub on.
- While the hub is connecting to your network, download, install, and sign in to the Arlo app.
- Make sure the camera batteries are charged and power on the camera.
- Through the mobile app, you will connect the hub to the app, and it will search for cameras. Once found, you will sync them to the hub using the sync buttons. Blue LEDs will flash to let you know the connection was a success.
- Once connected, you will see the view of the camera through the mobile app; the system is set up.
- To install the camera indoors, you can place it on any flat, stable surface. The flat bottom keeps the camera in place.
- To mount outdoors, find your mounting location and place the camera there to ensure the wireless signal is strong. If the signal is weak, moving the camera a foot or two at a time may find a “sweet spot” close to your ideal mounting spot.
- Screw the magnetic base to the mounting location.
- Connect the camera to the base with the magnets located in both the mount and the camera.
- Adjust the camera to get the desired view, using the app as a guide.
The entire process (for a single camera) should take less than 20 minutes. After that, you can average 5 to 10 minutes for each additional camera.
Bottom Line: Install is simple. Both cameras are easy to set up, mount, and use.
Let’s Talk About the Camera Hubs
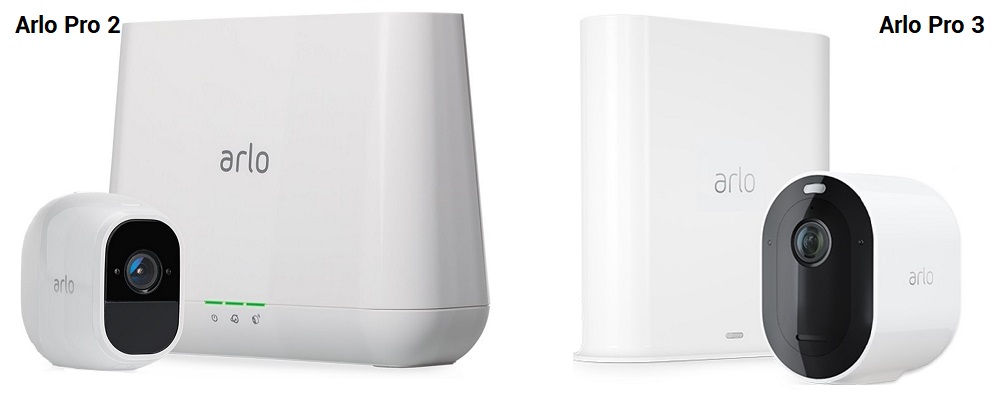
The hubs are what connect the cameras to the cloud and mobile apps. While technically you can use a Pro 3 on a Pro 2 hub, it isn’t advised. All Arlo systems are back-compatible, though, and each hub will use all Arlo cameras.
However, the Pro 3 uses what Arlo calls the SmartHub. It has advanced features (through the subscription service) that the standard hub doesn’t have. So, if you already have a Pro 2 system and want to take advantage of the Pro 3 cameras, you will need to get the SmartHub. The SmartHub will accommodate all features of the Pro 2 and Pro 3 cameras.
The good news is that you can get the basic set up kit for the Pro 3 and then add Pro 2 cameras later at a lower price.
Aside from the cloud service upgrades (I will cover these further below), the biggest difference is in the local storage. The Pro 2 hub uses USB dongles for local storage, which is nice. However, the system is designed more for a back up to the cloud storage and not local storage of all the camera feeds.
The SmartHub addresses this and changes the local storage to a MicroSD card. You can use a MicroSD card with a capacity of up to 1 Tb. It is also designed for stand-alone storage, unlike the standard hub.
Bottom Line: If you are getting a new system, go with the Pro 3. If you only want to add new cameras to an existing system, the Pro 2 is more economical.
The Cloud Storage Became Confusing, Let’s Sort it Out
When Arlo released the Ultra, they had to make changes to their subscription plans to accommodate the new features. Since then, it became confusing as to what owners needed to purchase.
For the Arlo 2, you don’t need a subscription at all, if you don’t want one. It is advised to get the Arlo Smart Basic plan at a minimum. This will cost you $3 or $10 per month and will give you storage in the cloud for your recordings, open up the 3-second lookback feature, and allow you to use local storage.
The free plan the comes with the Pro 2 has a 7-day storage option that will fit most people if they don’t want to pay a monthly fee. You do lose a couple of features, but it isn’t something you must have.
The Pro 3, though, does require a subscription if you want to store, save, or review recordings. You don’t get the free 7-day rollover, so a subscription to at least the basic plan is required (Premiere and Elite options available, too). However, you do get a three month trial to the Smart basic plan to try it out and get used to the features before you have to pay.
Note: buying the Arlo Ultra will give you a 1-year subscription to the Smart Basic plan.
From there, you also have the option to pay for continuous recording. This gives both cameras the option to live stream 24 hours per day, and every second is recorded and stored in the cloud. It is a second purchase aside from the Basic plan, though, so be aware of that.
You can get the full break down of each plan, the pricing, and what features are unlocked and included by checking out the Arlo Subscription page.
Bottom Line: Arlo Pro 2 is the better option for homeowners with one or two cameras. The free service is excellent for what it provides.
Video Resolution and Infrared Night Vision
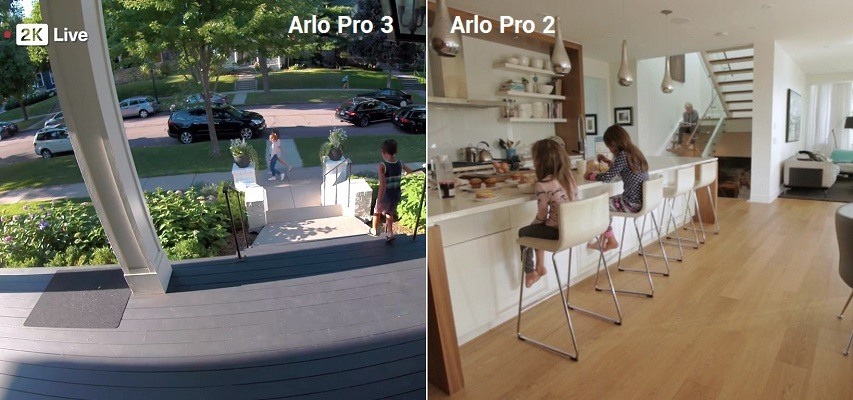
The Pro 3 was created to bring a more affordable option to market that would appease the masses and fit more homes. The resolution was dropped from 4k to 2k (compared to the Ultra) which is still an improvement over the Pro 2, which records in 1080p HD.
When viewing the cameras, the Pro 2 can have a grainy appearance as the pixels try to keep up with movement and natural light sources. Sometimes colors will bleed over the edges, and faster movements can appear blurry.
The Pro 3 introduced a feature known as High Dynamic Range or HDR. This feature utilizes the ultra-high definition clarity to prevent glares, color bleeds, and blurry images. When viewing stills, you can see details on clothing and other features such as tattoos or the like.
With the Pro 2, you will be able to tell what clothing the person is wearing and that they have a tattoo, but beyond that, the camera won’t be much help.
Night Vision, Lighting and Sirens
Night vision for both cameras is touted as full-color, but a lot of this will depend on the light level around the camera. Better lighting will make the full image color, but don’t be surprised if you see infrared shadows or the images blinks to black and white often.
The Pro 3 address this issue with more powerful LED infrared bulbs and spotlight. The Pro 2 doesn’t have a spotlight. You can activate the light manually or set it to come on when there is motion detected. The Pro 3 will also offer you the ability to make the spotlight strobe red, indicating a recording camera for the would-be intruder to take notice of.
With both the Pro 2 and Pro 3, you can also use the mobile app to enable two-way communications. You can talk with the person in view of the camera through the app, and your voice will come from the camera speakers. With the built-in microphone, you will be able to hear the responses.
Finally, there are sirens. The Pro 2 has a siren at the hub, a 100dB, piercing siren that will definitely get your attention, and that of your neighbors if they are close enough. The Pro 3 moves the siren to the camera and out of the hub.
It is still 100dB and still pierces the air with a shrill sound. You can activate the sirens manually or set them up to be activated with motion detection.
Bottom Line: The Pro 3 is a slightly better option. Better resolution along with the standard features they both share, put it slightly ahead of the Pro 2.
The Mobile App and 3rd Party Integration
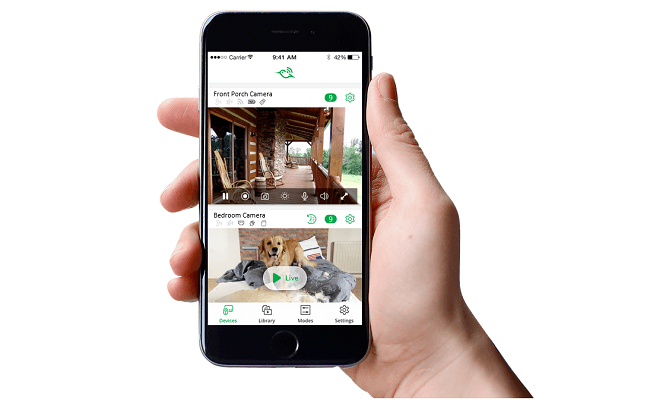
The Arlo app is a complete and user-friendly app that works with all the Arlo cameras. If you have an existing system and are familiar with the app, you don’t need to download a new one when you upgrade to newer cameras.
With everything connected to your wireless network, you also have the ability to use 3rd party smart home integration devices. All Arlo cameras now work with Apple HomeKit (most Pro 2 cameras are now enabled, though still being tested), Amazon Alexa, Google Assistant, IFTTT, Wink, and others.
Arlo is working on rolling out the use of Z-wave and ZigBee integration as well, though it hasn’t reached all of the camera options yet.
Bottom Line: The app is easy to use and works well; you will need it for all 3rd party integration methods and controlling the cameras. This round is a push since both models use the same app.
Frequently Asked Questions
Let me take the time now to answer some of the commonly asked questions about the Arlo Pro 2 and Pro 3 cameras.
Q. What is the Arlo Smart rich notification feature?
A. The Arlo Smart rich notification is a feature to Arlo Smart subscribers that allow them to get push notifications and alerts on their mobile phones without having to log into the app. They, of course, work like a regular notification, except that your Arlo app doesn’t need to be running or even logged in to have the notifications sent.
Q. How do I contact Arlo support?
A. If you are in the United States, you can call Arlo at 1-408-638-3750. For further support, they will direct to you their support center with documents, knowledge base articles, and a community forum for assistance.
Q. Are the cameras waterproof?
A. The Arlo Pro 2 and Pro 3 cameras are designated weather-resistant. They can withstand rain but not being submerged in water. Cold and extreme heat are also tolerable within the accepted ranges (-4 to 113 degrees F).
Q. How does the camera detect motion?
A. The Pro 2 and Pro 3 cameras use what is called PIR technology. The infrared lights will detect heat signatures and alert you when there is a heat difference between the object and the surrounding area. Side to side movements are more noticeable than head-on movements. This is why it is advised to put the cameras at an angle and up high to prevent direct contact from a head-on vantage point.
Q. What are the Arlo Pro 2 and Arlo Pro 3 minimum internet requirements?
A. For the Arlo Pro 2, you will need a broadband internet connection with a minimum of 1Mbs upload speed. For the Arlo Pro 3 cameras and SmartHub, the minimum upload speed needs to be 2Mbs.
What I Like About the Arlo Pro 2
- 3-second look back and continuous recording options available.
- Battery or wired installation methods.
- The user-friendly mobile app controls all Arlo cameras.
What I Like About the Arlo Pro 3
- 2k resolution with HDR capabilities for better image quality.
- SmartHub connection for better wireless range and local storage.
- High-quality HD color night vision.
Conclusion
The decision between buying the newest model Arlo Pro 3 and the older, stable version Arlo Pro 2 is still a difficult choice. Arlo Pro 2 has been the flagship model since its release, and even with the Ultra and Pro 3 cameras being unveiled, it still has a tight grip on the market.
If you are looking for a single or double camera set up and don’t need a lot of extra fuss, the Arlo Pro 2 is an optimal choice. It is affordable and offers everything you need. However, for better images, larger WiFi range, and easier recharging capabilities, the Arlo Pro 3 is a better option. The 2k resolution, affordable price, and SmartHub integration make the Arlo Pro 3 my choice in this match up.