Arlo has built security cameras with smart home security in mind. Now with the Arlo Q series, the focus switches to business security. While home use is still prevalent, Arlo gives businesses a leg up as well.
In this article I will explain to you the small differences in the Arlo Q and the Q Plus. We will look at what both cameras do, compare them side by side and I will even answer your most common questions. Continue to the full article below to learn every feature and option and to find out which camera I think is the better option for you. Here’s a big hint: It’s the Arlo Q Plus.
Contents
The Differences of the Qs
The Arlo Q is one of the most adaptive and intuitive security cameras made, based on reviews and purchases. So what puts the Plus in the Q Plus?
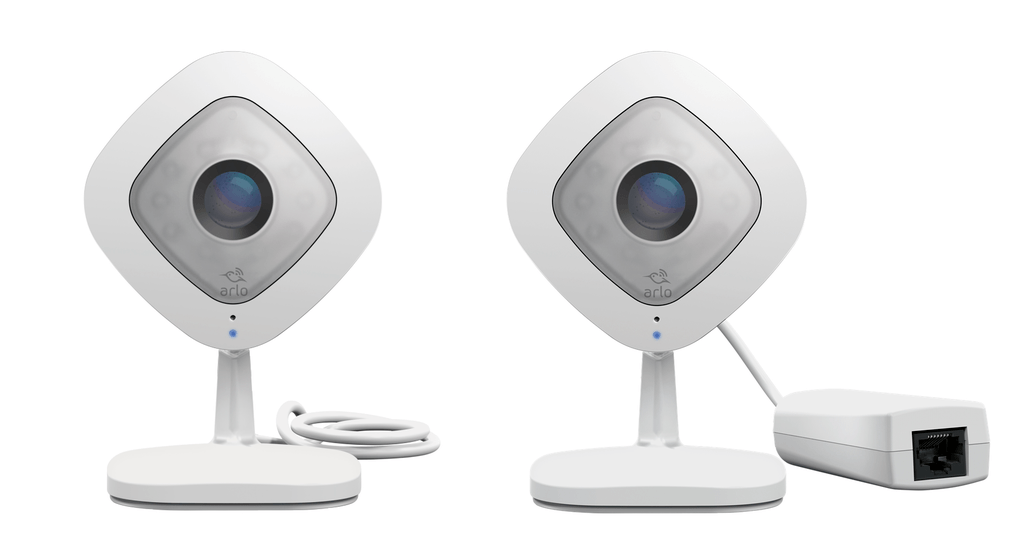
- The Arlo Q Plus has a built in Power of Ethernet (PoE) adapter for wired networking; the Arlo Q is wireless only.
- The Q Plus has a MicroSD memory slot for extra storage; the Arlo Q doesn’t.
- Arlo has given the Arlo Q Plus small bug fixes and upgrades to the hardware that the Arlo Q doesn’t have.
The Similarities of the Cameras
With only three differences in the cameras, there are a lot of similarities.
- Both cameras record in full 1080p resolution.
- Each model has a wide angle 130 degree field of view.
- The Arlo Q and Q Plus each have night vision recording.
- Both versions use the same mobile app for control and review.
- The Q and Q Plus both have motion detection and automatic alerts.
- Each camera also has the ability to live stream.
- Both of the Arlo cameras have third party applications including Amazon Alexa.
- The cameras are both capable of connecting to your wireless network.
- The Arlo Q and Q Plus are wired cameras for power.
- Both cameras feature two-way communications.
- Arlo Q and Q Plus have free cloud storage for a rotating seven day period.
Side By Side Comparison Chart
Let’s take a look at all of the features side by side.
| Arlo Q | Arlo Q Plus | |
| Resolution | 1080p | 1080p |
| WiFi Connection | Yes | Yes |
| Ethernet Connection | No | PoE |
| Additional Storage | No | MicroSD Card Slot |
| Motion Zones | Yes | Yes |
| Field of View | 130 Degrees | 130 Degrees |
| Control | Mobile App | Mobile App |
| Alerts to Phone | Instant | Instant |
| GeoFencing | Yes | Yes |
| Live Streaming | Yes | Yes |
| 24/7 Recording | Yes | Yes |
| Color Options | White Only | White Only |
| Two-Way Communications | Yes | Yes |
| Cloud Storage | Free, 2 Paid Plans | Free, 2 Paid Plans |
| Wireless Power Supply | No | No |
| Warranty | 1 Year | 1 Year |
| Price | Check on Amazon | Check on Amazon |
Features and Options Detail
Now that we know more about the cameras, let’s dive into the details of the features and options to get inside and learn what’s really going on.
1. Installation
Installation is identical for each camera and the process is quite simple. Before you begin you will need to ensure your Internet connection is active, that you have your mobile phone handy and you have unpackaged the camera and included mounting parts.
The first thing you will do is plug the USB cord into the back of the camera and the power adapter. Plug the power adapter into your wall outlet and as the camera powers on the LED indication light on the front will turn amber.
Using your mobile phone, download the Arlo App form your devices respective app store (the app is a free download from the android and iOS app stores.). Install and run the mobile app to continue the set up.
From the app select new system setup and from the menu choices find and select Arlo Q as the camera to install. From here you will follow the instructions on the mobile app to connect to your wireless network. Once you are connected you will need to sync the camera.
To sync the camera find the triangular sync button on the side of the camera housing and press it in until the amber LED light blinks blue. Once the light begins to blink it means it is searching for the connection codes. Press continue on the mobile app.
The screen on your phone will show a QR code. Face the phone towards the camera so that it can see the QR code (about eight inches. When sync occurs you will hear an audible chime.
If you already have an existing Arlo system, instead of choosing new system setup, you will instead log in to your existing account and then choose add new device from the menu. The steps are the same from that point forward.
It is important to note that the Arlo Q and Arlo Q Plus do not require connection to the Arlo base station. The Q and Q Plus act as their own base station.
If you want to utilize the PoE connection instead of the wireless connection on the Arlo Q Plus, you do not need to plug the USB cord into the camera. Instead, plug the ethernet cable into the port on your router or modem and then into the camera. Power will be supplied to the camera through the PoE connection.
Once set up is complete, you can then mount your camera on a flat surface using the base as a stand, or on a wall using the included screws and anchors. The base will snap into the wall mount plate once it is secured to the wall.
All said and done, from unpacking to mounting, the entire process should take you less than 10 minutes.
Bottom Line: This is a tie. Both cameras set up and mount the same way.
2. Network Connections
The major difference between the two cameras is the ability for the Arlo Q Plus to utilize a direct connection to your router or modem using the ethernet cable.
Both cameras will still use the wireless connection if you so choose. The Arlo Q only has the ability to use a wireless connection. The connection has been tested and reviewed to work up to 220 feet from the wireless router. This will depend greatly on our wireless signal, band of signal (b/g/n) and the number of obstacles, walls, and interference between the camera and the router.
[easyazon_image align=”center” height=”414″ identifier=”B01DNFE25C” locale=”US” src=”https://smartrobotichome.com/wp-content/uploads/2018/05/41VmpwWgKIL.jpg” tag=”srh-easyazon-20″ width=”500″]The Arlo Q Plus comes with a PoE connection option. This is designed for homes and business that may have the need for cameras to be set up further from the base station than the wireless signal can travel, if you have connectivity issues, or if you require a better signal than your wireless can provide.
When using the PoE connection the camera will get power and connectivity through the ethernet cable. There will be no need to connect the USB power cord into the camera.
Bottom Line: The Q Plus wins. One of the two upgrades, the PoE connection option frees up the ability to have greater signal strength at the camera.
3. Mobile App
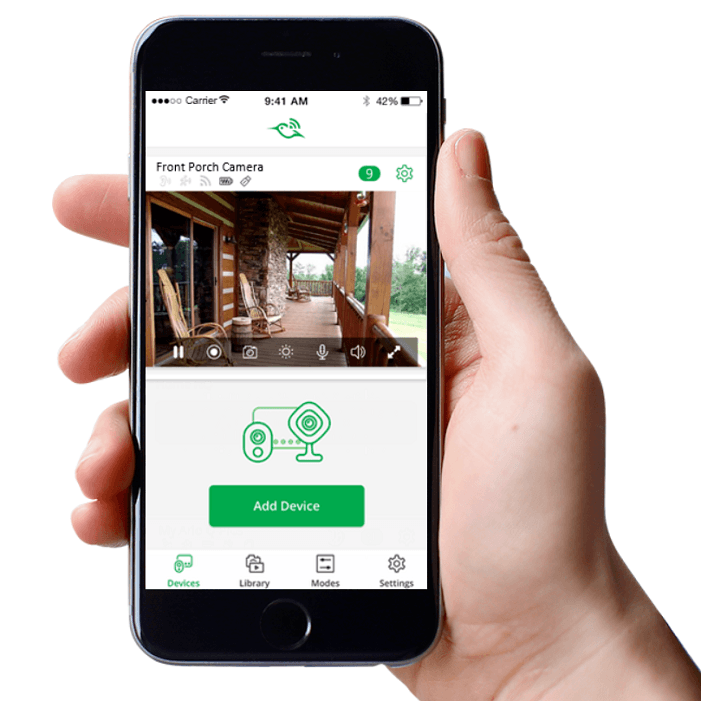
The Arlo app has many uses. To start with you will be able to set up each device, camera and base station using the mobile app. The free download will also allow you to create detection zones for each camera, view live streaming and review recordings.
Further, you will be able to change the detection sensitivity of the cameras on an individual basis. The app will be your main point for using the cameras and their abilities. You will get phone alerts from the app when a motion is detected.
You will also be able to use the two-way communication features by speaking and hearing through the app when activated. The mobile app will also allow you to enable GeoFencing to further enhance your ability to control your cameras and security system.
[easyazon_image align=”center” height=”500″ identifier=”B01DNFE25C” locale=”US” src=”https://smartrobotichome.com/wp-content/uploads/2018/05/51n7xdZU2bL.jpg” tag=”srh-easyazon-20″ width=”470″]Bottom Line: This is also a tie. Both cameras utilize the same mobile app.
4. Alerts
The alerts aren’t generally mentioned and I wanted to bring them to your attention here. The Arlo Q series makes use of motion detection to begin recording and then send alerts to your mobile device.
These alerts will tell you that the camera has caught movement and you should check out what is going on in the camera’s field of view. What you should be aware of, however, is that you can make changes to the sensitivity of the detection.
When you first set up your camera you will most likely get some false alerts. The amount varies greatly, but it is very common to have multiple false alerts over the first few days. You can use the mobile app to change the sensitivity from low to medium to high. The higher the setting, the more alerts you will receive.
Another point of concern is the algorithm that detects motion will not be able to tell the difference between humans and animals. This is important for pet owners, as pets can and will set off the alerts.
When you do get an alert that is valid, you will have the option to enable communications. Each camera has a built-in microphone and speaker. You will be able to communicate live with whomever is near the camera.
It should be noted that your voice will sound a bit mechanical, especially on the Arlo Q, since it will have to travel over the wireless waves and be pushed through the base station prior to being heard from the camera.
One of the advantages the Q series cameras have over other Arlo cameras is that the alerts no longer suffer from delays and are as instant as any other camera on the market.
Bottom Line: This round is a tie. Both cameras have the alerts and set ups for false alerts.
5. Motion Zones
Motion zones are set on a per camera basis. You will use the mobile app to define the zones for either active or inactive detection. These are useful, for example, if you have a door in the field of view and a blank wall next to it. You can set an inactive zone over the wall to prevent alerts from persons already inside that may pass in front of the wall.
The camera will ignore any sound or movement coming from an inactive zone. You will also be able to set active zones. In the above example, you can set the door as an active zone and any motion or sound from that zone will send an alert and begin recording.
The zone set up and configuration is done all through the mobile app and you will be able to shape, set and activate the zones using your fingers on your phone.
The sensitivity can also be set while you are creating or editing your zones. This will help false positives by adjusting your sensitivity to a lower setting if you find you are getting more alerts than you should.
Bottom Line: Another round that ends in a tie. Both cameras have the enhanced zoning ability through the mobile app.
6. Storage
One thing that Arlo has over almost every competitor is their free cloud storage for their cameras. Using the cloud storage you will be able to store clips and recordings in the Arlo cloud on a seven day rotating schedule per month.
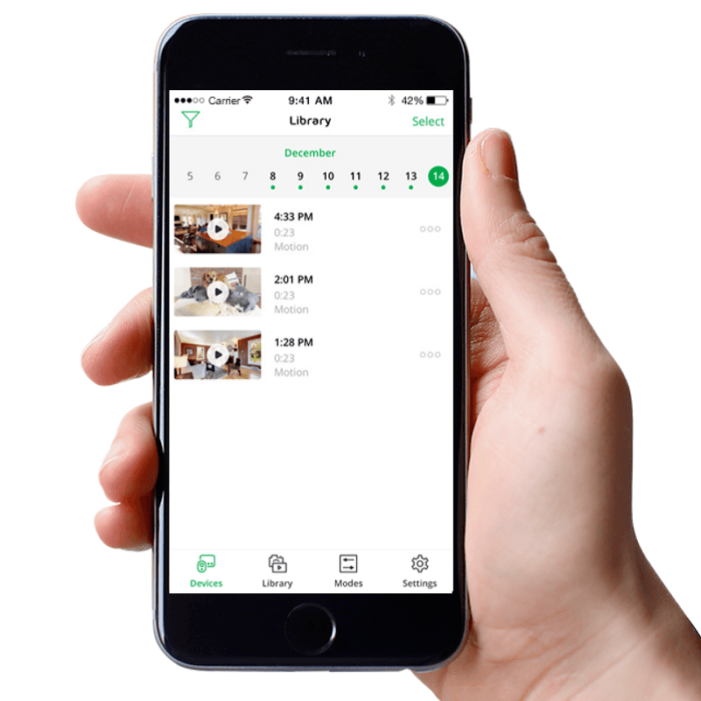
What this means is that recordings made and uploaded on Monday will stay in the cloud until the following Monday when they will begin to be overwritten. You can connect up to 5 cameras to the free cloud service. If you run more than 5 you will be required to purchase a monthly plan.
Arlo has two plans each with two payment options. The basic plan can be purchased for $3 per month or $30 per year. The premium plan, which includes live monitoring, can be purchased for $10 per month or $100 per year. (Note that continuous recording using CRV will be its own plan with its own amounts based on your needs).
However, if you use less than 5 cameras, the free cloud storage will be more than enough for your needs. If you plan on utilizing the Q series continuous recording you will need to purchase a monthly plan.
However, if you have the Arlo Q Plus, you have another option. The Q Plus comes with a MicroSD card slot that will support cards up to 128GB. This allows you to store recordings and clippings directly on the card without having to worry about uploading to the cloud.
You should realize that the card will not automate rotating of your recorded clips and once the card is full you will need to manually remove files to continue recording to the SD card.
Bottom Line: The Arlo Q Plus wins. The ability to have local storage with the MicroSD is something the Arlo Q doesn’t offer.
7. GeoFencing
One important aspect I want to briefly explain is GeoFencing. With the cameras synced to your system and the mobile app on your phone, you can set up a GPS range around your home. With GeoFencing enabled, when your phone leaves the area all the cameras will be activated.
When you return into the GPS area, the cameras will be disabled. The benefit to this is the ability to not have to worry about setting off your cameras as you leave or enter your property and have recordings take up space and send false alerts.
Bottom Line: The winner is you. Both the Q and Q Plus have GeoFencing capabilities.
8. Third Party Applications Integration
Arlo has made third party app integration as near seamless as it can get. The ability for voice control through Amazon Alexa is already built in. You can use the Amazon Echo Show to view your recordings through your TV or connected device.
You can also control other set up options and devices using Google Home, IFTTT, Wink, SmartThings and many others.
This ability takes the full control out of the palm of your hand and places it on a larger screen. With recordings in full 1080p you won’t lose picture quality either. The two-way communication can also be set up to work through these devices in case you don’t have your mobile phone readily available.
Bottom Line: This is another tie. Both cameras have third party integration abilities.
Frequently Asked Questions and Answers
It is now my favorite part of the article. I get to answer your most common questions about the Arlo Q and Arlo Q Plus.
Q. Is the mobile app only for mobile phones?
A. Yes. That is why it is called a mobile app. However, I know what you are really asking. You want to know if you can install the app on your computer and the answer is yes.
Arlo has a version of the app ready to be downloaded and installed to your laptop or desktop computer. You can install this at home or at work or both and used all of the functions with the exception of the two-way communications.
Q. I don’t need a base station like with my other Arlo cameras, do I need to switch all my existing cameras to a Q or Q Plus?
A. Absolutely not! NetGear has made painstaking advancements to ensure that all of their cameras work with all versions of their systems.
The Q series does not require nor use a base station. However, if you already have a base station for other Arlo cameras the Q series will still sync and work with your existing system. The only difference is that you do not need to connect them tot he base station to have their clips and recordings uploaded to the cloud.
Q. Can I use the Q series cameras outdoors?
A. Can and should really are different things. You can use the camera inside your car, but you really shouldn’t. The Q line is not rated for outdoor use. Because it is more of a business minded camera than for home use (which, by the way it works excellent for) there isn’t a huge demand for the cameras to have outdoor capabilities.
That being said, if you want to cover your front door for example and do not have an existing Arlo system, then it is possible to mount the camera over the door as long as you can fully protect it from heat, cold and moisture. Since this isn’t very practical, I suggest you go with an Arlo Pro for outdoor use.
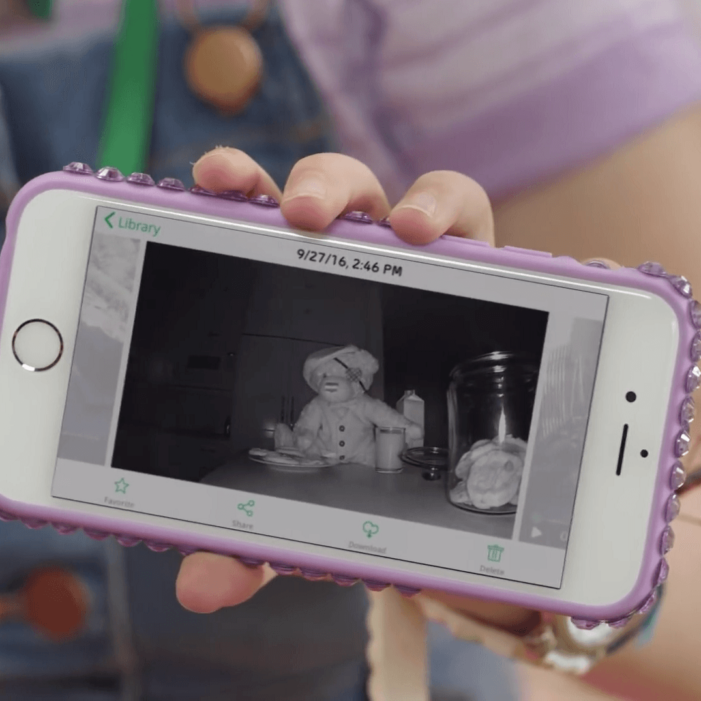
Q. They record at night as well?
A. Yes, each camera has nine infrared LEDs around the camera lens. In low-light and no light situations the cameras will still detect motion, sent alerts and record in full 1080p. The color may be affected depending on the amount of external lighting sources, but you will be able to clearly see (and hear) what is going on in the camera’s field of view.
Q. What are the streaming and continuous recording options all about?
A. Great question! Allow me to start with the live streaming. Using the mobile app (or Echo Show, or desktop app) you can pull up a live view of any of your Arlo Q/Plus cameras and view the feed live.
You can do this for as long as you like, since it is not recording unless there is motion or you manually tell it to, the live stream is just that, a live view of what the camera can see.
The continuous recording option is something fairly new to the Arlo line up. To enable this feature you will need to purchase one of the CVR monthly plans. When you do and you connect a camera (or cameras) to the CVR you can record 24 hours per day, seven days a week.
Keep in mind that while this may be a suitable option for certain circumstances, it will also take up bandwidth on your wired or wireless connection. If you already have a slow connection and you run the CVR, you will lose speed for your other devices. In human speak, you might not get to stream Netflix while your camera is recording constantly.
Q. Where do I plug my ethernet cable in? I don’t see a port for it on the camera.
A. That is because there isn’t one. You will see the micro USB connection for the power cord. To run the camera with a direct connection over the PoE then you will unplug this cord from the camera and plug in the PoE adapter instead. The other end of the adapter has the ethernet port for your cable.
Q. I pay for the premium cloud service and already have an arlo system. How come my Arlo cameras I already have won’t record constantly like my Q Plus?
A. The simple answer here is that the previous Arlo cameras do not have the functionality to record continuously. This is a feature NetGear added to the Arlo cameras starting in the Q series only. If you have the first 2 generation Arlo cameras or the Arlo Pro, you will not be able to continuously record with them now.
What I Like About The Arlo Q
- Hardwired USB power supply.
- Ease of installation and set up.
- Mounting is quick and simple.
- Amazon Alexa connectivity.
- Customized detection zones.
- Free cloud storage.
- Easy to use mobile app.
- Two-Way Communications.
- GeoFencing.
- No Base Station needed.
- Full 1080p resolution.
- Night vision recordings.
What I Like About The Arlo Q Plus
- Everything from the Arlo Q (because they are identical in those aspects).
- Additional storage (up to 128GB) with the MicroSD card slot.
- The ability to use PoE for a stronger more reliable connection.
In Conclusion
The Arlo Q and Q Plus are great home security cameras and are designed to be better suited for business applications. Each one, on it’s own is a solid choice for your security needs and you really can’t go wrong with either one.
The good news is that because of their stand alone set up (they don’t need a base station) and the fact the NetGear makes all Arlo cameras work with any system, you don’t have to choose. You can easily get one of each (or multiples) and they will all play nice together.
Should you upgrade to a Q Plus if you already own a Q series? I wouldn’t say you need too. However, if you need the local storage the MicroSD slot offers then you may want to pick up a Q Plus. Likewise, if you have cameras close to the router or modem and want to utilize an ethernet cable instead of your WiFi connection, then you will have to get a Q Plus.
If you are making a first time purchase, however, you may as well go with the Arlo Q Plus. The additions of the PoE and MicroSD slot are well worth the small increase in price difference (which seems to get smaller by the day). Aside from these two differences, the cameras are identical in every other way. This is why I pick the Arlo Q Plus as the winner.